DodgeIntrepid.Net Forums banner

3.5 Timing Belt replacement issues

1 reading
7.8K views 9 replies 3 participants last post by  anak  
#1 · (Edited)
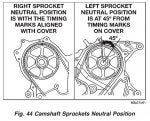
Guys, I don't know how I f'ed this up, but I can't rotate my crankshaft to TDC. I know, I know, I must be off a couple teeth, or a tooth, but if the pointers on both camshaft sprockets are BETWEEN the dots, and the crankshaft will approach TDC, but will not budge ANY FURTHER once it gets just a hair from being aligned, what the F is going on??? I know, it must be a piston contacting a valve, and therefore stopping the crankshaft from rotating. But how can this be if all of the timing marks are aligned???

Yes, I had the marks lined up before I removed the old belt, but I advanced the pointer a tad past TDC because I had read that being a tooth off was common on these engines after a timing belt replacement, and that this was due to the pointers moving after tension was applied to the timing belt. But I also watched a great YouTube video of a timing belt replacement and the guy wedged screw drivers on both cam sprockets and the crankshaft sprocket in order to keep perfect tension on the belt. He started from the crankshaft and worked his way up the right side, over the right cam sprocket, under the water pump, and then on to the left and over the tensioner. I did this too, got everything lined up as before, than turned it over a few times. I DID NOT, like an diot, remove the spark plugs, so it was hard to turn over, and the crank bolt broke. After procuring a new bolt, and removing the spark plugs, it would not budge at all, even after putting the harmonic balancer back on. Took off the balancer again, took off the timing belt, camshaft sprockets perfectly aligned, crankshaft will not budge once close to TDC. Will rotate backwards a bit, but trying to rotate towards TDC is a no go.
 
#2 · (Edited)
How far from TDC are you when starting to turn the crankshaft, and how close to TDC are you when you get interference?

With the cam marks set between the dots and while 1 and 4 are moving thru 120° BTDC and 120° ATDC, other pistons (2 and 5, or 3 and 6) are moving thru their TDCs in pairs, and the valves are at varying degrees of being open, including some valves being fully open or close to it.

You may have to rotate the cams to allow those other pistons to clear valves as they move thru their TDC, or if that is not successful, you may have to remove or loosen the rocker shaft assemblies.

When re-installing the rockers, make sure you have no. 1 close to TDC and cams in their neutral positions (that’s where all valves will be completely closed or close enough to closed) - the idea of course is to not be forcing the rocker shafts into their final position with a valve pressing into the top of a piston:

Image


It may help to know that with no. 1 at BDC or 60° BTDC or 60° ATDC, all pistons are either at BDC, 60° BTDC, or 60° ATDC and therefore enough down in their bores that you are free to rotate the camshafts thru their full 360° of rotation without interference, so it may be possible to get the crank into the no. 1 TDC area by stopping when you get interference and moving the cams a little (in just the right sequence - kind of like a Rubik’s cube) to get past the interference and eventually get the crankshaft into no. 1’s TDC happy place.

But the sure-fire way to get it to TDC is to remove the rocker shaft assemblies, put crank at no. 1 TDC, then reinstall the rockers.

Good luck.
 

Attachments

#3 · (Edited)
(Joe Pesci voice) OK - ok!

Method 3:

This method will involve putting your own marks for the other pistons with a Sharpie on the cam and crank sprockets and moving the cams to be correctly sync’ed to whichever 2 pistons you can now get to TDC, but starting with the cams in the correct positions for no. 1 TDC they are already in. (I believe the number of sprocket teeth is divisible by 3, so you might be able to count teeth for accurate marks. Remember: Cams rotate half the amount that the crank rotates.)

After making your temporary marks, back the crank to set the piston that you can set to its TDC at its 60° BTDC position to allow you to rotate the cams at will. Now move the cams to the marks you made for that piston, then advance the crank to your mark for that piston, and install the belt. Then rotate crank to factory mark, and verify cam timing to no. 1 factory marks. Correct as needed.

Use whichever method seems easiest to you.
 
#4 ·
Thanks Peva, good information. Once the timing mark on the crankshaft gets within a few millimeters, (a knats hair?) of the timing mark it just stops, and will not budge. I can back it off, but have to use a pry bar, keep in mind I have the harmonic balancer back on, once it begins to move away from TDC, just a bit, I can grab the balancer and back it off by hand, so I'm convinced that one of the TDC pistons is contacting a valve. As to how this happened, I have been cleaning the intake ports, and I think a piece of debris (wouldn't have to be very big) has caused a valve to stick open. How else could this happen??? In any event, my plan it to remove the camshafts, check to see if a valve is stuck open, if not, than set the crank at TDC as you mentioned, and then bolt the cams back on with timing marks aligned. If a valve is stuck, it would seem that if its not debris, then it could be a bad valve guide, or valve seal???
 
#5 ·
Ah - so you’ve been cleaning the ports. It wouldn’t take a very big chunk to jam between a piston and the head - and a valve may not be involved.

Prior to my replacing the timing chain and water pump on my 2.7 at a little over 200k miles, it had been burning oil like crazy due to bad valve stem seals for a couple of years. I replaced the valve stem seals because of that (which totally fixed the burning oil problem, BTW), but to keep the valves from dropping into the cylinders when replacing the valve stem seals, I used an air compressor with no moisture trap. Lo and behold, after completing the valve stem seals and getting the chain and water pump done, when I went to rotate the engine by hand, I had the same problem as you did. It turns out that the moisture in the compressed air caused the carbon in the cylinders to swell up enough to cause an interference between the pistons and the cylinder heads.

It took me a day or so to figure out that that’s what happened. Short of pulling the heads, which I was determined not to do, I decided to put a measured amount of Sea Foam into each cylinder thru the spark plug holes, and then sucked it out using clear vinyl tubing duct taped to the end of a shop vac hose. I repeated that several times in each cylinder. The first time, the Sea Foam getting sucked thru the vinyl tube was as black as coal. After about the 4th time in each cylinder, it got mostly clear, and the interference was gone. The Sea Foam took the hard layer of carbon and more or less liquified it, or at least allowed it to break up into powder floating in liquid. (I wasn’t too crazy about that flooding into the rings and down the cylinders, but it didn’t have any noticeable effects. I changed the oil twice within 100 miles after I was back together and running again.)

If you think a piece of carbon might be causing interference, whether involving a stuck valve or not, you might see if some Sea Foam in the cylinders might soften it enough to get rid of the interference. I guess too that you may be thinking that a chunk has gotten caught between a valve and it’s seat. I guess that’s certainly possible too.

If you’re able to turn the crank back to the 60° BTDC position, like I said previously, you can turn your cams complete 360° with no interference. Perhaps turning your cams around a few times will cause the carbon chunk to drop on thru. Sea Foam (in thru the spark plug holes as well as thru the intake ports) could help make that happen and would soften it up so it wouldn’t cause further problems until it could blow on thru once it’s all together and running again. Otherwise, you may have to pull the heads.
 
#6 ·
Ah hah, yes, I have been scrubbing the intake ports, particularly the left side, first cylinder, which just happens to be...THE NUMBER ONE PISTON! Damn it. It was FULL of oil sludge, carbon, just nasty. All of the other intake ports had reasonable amounts (slight amounts) of carbon and oil residue. And the fuel injector port on number one intake, wow, it was so nasty I thought an o-ring was left in there, just caked with crud. I used rubbing alcohol and an old tooth brush, then used ammonia, more scrubbing, then brake cleaner, just sprayed it in there, then between each scrubbing, wiping with a rag, vacuuming with a shop vac. I figured the valves were closed so nothing would get into the combustion chamber. The lower intake gasket had failed a bit around the number one port, allowing a mixture of oil and coolant to seep into the intake port and create a nice sludge mess. This engine has 90,000 miles on it. I'm doing a 2.7 to 3.5 swap. 2.7 engine was done, crankcase was full of coolant. Thanks Peva, I will try the sea foam, and also backing the crank to 60 degrees BTDC and turning the cam sprockets.
You know, after a closer look at that 2.7, it was built really strong. Just has those damn crappy water pumps, bad location, and a PCV system that was inadequate. I thought maybe I could use the crank bolt from the 2.7, but no way it will fit. It's much thicker and stronger than the 3.5 crank bolt.
 
#8 ·
you may already know this, but I'll mention it anyway, that liquids are relatively incompressible. So, if there is any liquid in there, you should pull a plug and suck out anything in the cylinder. If you "hydraulic a cylinder", something going to have to give, and in extreme cases, connecting rods have bent.
 
#9 ·
Yes, that is also a possibility, good point. I would hope I didn't do any damage by turning it over twice by hand, before it bound up. Update: I took off the left head, and all valves were closed. Combustion chambers and valves looked normal. What did NOT look normal was the amount of loose carbon chunks, particularly the number 3 piston, which is next to number 1. The other pistons looked normal for 90k miles, but number 3 had a big chunk of brown carbon, with other smaller chunks. Glad I'm pulling heads after all. And interestingly enough, I STILL can't turn the engine over by hand (still have the harmonic balancer on) and I'm NOT going to try and move it either. Not until I pull the other head. And If I still can't move it then I have much bigger problems than carbon!!! lol More updates to follow...
 
#10 ·
Here are some pics of carbon build up, notice the close up of cylinder 4, which is also coming up on a compression stroke, the carbon loosened as Peva stated, and was jamming the piston. Cylinder 3 also had chunks of loose carbon. So glad I pulled the heads, don't think anything would have cleaned this without doing so...
 

Attachments