DodgeIntrepid.Net Forums banner

Question on starter repair kit & replacing plunger.

1.2K views 15 replies 3 participants last post by  pt500  
#1 · (Edited)
I bought the Dorman "starter motor repair kit" from Rockauto a while back and was going to follow these good previous thread instructioins (but some photos gone?):

3.3 liter 96 intrepid denso starter rebuild

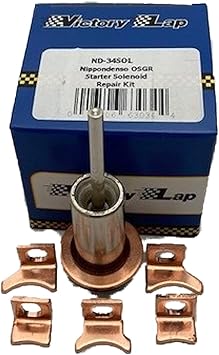
None of the kits on Rockauto include the plunger, and the link to the sales listing in the old thread (says "plunger #35") is dead; the URL also said: Nippondenso Denso starter solenoid plunger 035. The 1st Gen Parts Catalog doesn't have the p/n. As I recall there used to be a catalog online of starter plungers by Victory Lap (and others?) but haven't found it yet (Edit: Amazon has their kits but not sure of the the p/n; their fitment listings are often wrong). Anyone know the correct aftermarket interchange p/ns for the plunger or the kits with the plunger (3.3L 1st Gen)? There seem to be various lengths for the same diameter.
Ebay photo (European seller):
Image


My local parts stores including NAPA say they don't have it (and Carquest closed), but some of them are now clueless, so I don't know if that is true. Couldn't find it searching on any of the local parts stores websites. A lot of the listings on ebay look like they may be cheap China-made stuff (when they show a US flag in the listing it usually means China). Also, any tips to add to the above thread on rebuilding the starter?
 
#2 ·
Below is the Victory Lap brand kit I personally used with good success and have recommended for years for 2nd gen. It includes the plunger.

The Amazon application tool shows the kit as compatible with '96 3.3.

 
#3 ·
Thanks. Found the Victory Lap online catalog (CPI).
The Amazon fitment says it works, but the catalog shows the the ND-34SOL is for the '98-'03 3.2L & 3.5L. Their alternator kit does show back to 1993, but not the starter kit. I'll look at it more carefully later tonight, maybe I'm missing it. Unfortunately, I've found the Amazon fitment tool is sometimes wrong for the 1st Gen parts. Like I wrote the rebuild thread seemed to indicate there was a Denso plunger p/n but I haven't been able to find it online yet.

I haven't disassembled it yet. Is the plunger usually still good, or can it be repaired somehow if worn?

BTW, I got an NOS reman Beck-Arnley starter off ebay, but I'd like to save the Mopar if I can.
 
#4 ·
Thanks. Found the Victory Lap online catalog (CPI).
http://www.cpidivisions.com/wp-content/uploads/2015/11/2015-application-CATALOG.pdf The Amazon fitment says it works, but the catalog shows the the ND-34SOL is for the '98-'03 3.2L & 3.5L. Their alternator kit does show back to 1993, but not the starter kit. I'll look at it more carefully later tonight, maybe I'm missing it. Unfortunately, I've found the Amazon fitment tool is sometimes wrong for the 1st Gen parts. Like I wrote the rebuild thread seemed to indicate there was a Denso plunger p/n but I haven't been able to find it online yet.

I haven't disassembled it yet. Is the plunger usually still good, or can it be repaired somehow if worn?

BTW, I got an NOS reman Beck-Arnley starter off ebay, but I'd like to save the Mopar if I can
The copper disc of the plunger is usually heavily worn and may in fact be the problem now, or will be later if you were to only put new contacts in.

Every time the starter is activated, the solenoid coil pulls the plunger down fast and hard so that the two copper contacts (which carry the full current load of the starter) make firm electrical contact with the copper disc of the plunger. There's mechanical shock as well as an electric arc/spark between the contacts where they contact the plunger's copper disc. The arc literally burns a little copper away from the disc and contacts each time. You'll see the effects of that when you get it apart. The contact/plunger disc electrical connection gets marginal and intermittent as the contacts and the disc get too thin (or pitted) from usage. The plunger is designed to rotate a little with each engagement/disengagement so that the disc doesn't get zapped at the same two places each time, so they can make the disc thinner than the contacts.

I've posted about that several times over the years and commented on how stupid or dishonest (take your pick) it is of the manufacturers to not include the plunger in the contacts kit. That's why I always recommend that Victory Lap kit. Advance used to sell that kit years ago but stopped - that's why I ended up searching for and finding it on Amazon - and usually cheaper there than for the rip-off (no plunger) kits.

BTW - Rock Auto lists the same aftermarket starter part numbers for '96 3.3 as for 2nd gen 3.2/3.5 (so the contact kit should be the same). I've always found their applications listings to be accurate.

The only thing that may not be obvious or fool proof on installing the contacts is that as you tighten the nuts on the contact studs, the contacts and studs will tend to rotate with the nut. The contacts have a flat surface to press against the plunger disc. You need to constrain the contact from rotating as you tighten the nut so that the contact's flat surface remains parallel to the mating surface of the plunger disc so that there's maximum contact area for the high starter current. If all that doesn't make total sense now, it should as you are assembling it.

Below is a good How-To video. He mentions and shows what I was talking about to keep the contact from rotating (he uses the word "twisting") as you final-tighten the nut (by firmly pressing the contact down flush against the flat surface below it).

 
#5 ·
The only other thing that I can think to mention is that, when removing the starter, it may be difficult to see/discover how to disconnect the solenoid control (small) wire from the starter (at least it was difficult on my 2nd gen, it was hidden from view - accessible by feel only). I lost quite a few minutes unsuccessfully trying to figure it out, and finally resorted to positioning my digital camera (or phone - I forget which - it was a few years ago) into the tight area above the starter and getting a clear shot of the connector. By downloading the photo onto my desktop, I could see the connector's release latch and exactly where to press it. Then, working blind from underneath the car, I could firmly press the latch while gently tugging on the wire to pull the connector off the solenoid's receptacle (latched spade lug).
 
#6 ·
Thanks for all the info. I'll probably get that kit if the starter listings are the same. The Victory Lap catalog must have just missed that.

Victory Lap also has the alternator rebuild kits listed. Have you rebuilt an LH alternator with their kit? I recall rebuilding an alternator on an old V8 Chevy, but it's been so long ago I can't remember the details (but it did work). Good alternators are expensive.

Off topic, but you mentioned the starter listings in Rockauto. Yes, Rockauto seems pretty accurate when it comes to the brand name parts. However I have had trouble just over the past several years with a few of their "wholesaler closeouts" where they are listed as re-boxed brand name parts (e.g. Moog, SMP, ACDelco, etc.) and it it turns out they are PRC junk instead. The problem may be that some PRC makers will either use the same part number as the brand name or list the brand name number below theirs. Apparently the newer Rockauto employees don't even compare the the parts visually. Years ago, many of their closeouts came in Carquest or NAPA boxes where the p/n interchanges were well-known, but these days I'd be reluctant with those unless it's something cheap. Also, they are now carrying parts from companies such as API (?) and a few others, which may just buy up lots of NOS parts from wherever and stick them in their packaging.

Also, for other people's info, I'd also beware of some ebay NOS auto parts sellers, and check any written negative feedback (e.g. wrong parts sent, messed-up returns, used parts listed as new, etc.). If they aren't rated near 100% and have a clear return policy, that's not a good sign.
 
#9 · (Edited)
Starter repairs easy and successful.
GM / Delco back in the day were easily rehabbe.
Chrysler Alternators not so much.
In addition to the CPI/Victory Lap catalog link I posted, below are the links to the other CPI pages. Looks like they make lots of other products; I wasn't familiar with them. You can actually buy directly from them, but like peva said, a few of the kits are cheaper from an Amazon seller, currently just $18 (Amazon stocks and ships it for one seller, so you can get free shipping with adding other Amazon stuff to $35).

There may not be a search function on the CPI site, so to find the part without scrolling through all of them you can do a Google site search with the part number in quotes. The alternator rebuild kits are obviously more expensive than the starter kits since they include more stuff. You may have to buy those on their site; I couldn't find the one below searching elsewhere.

However, sometimes Rockauto has decent brand reman alternators under $100 after core refund.

click on "online shopping."

catalog listng again - starter and alternator kits

ND-34SOL, $23 + shipping

There are a few different alternator kits depending on LH year & engine.
CRA-04, $77 + shipping
For 1993-0475-117 Amp, NDenso Unit
 
#13 · (Edited)
Thanks for the tips. I put a reman starter in and took the solenoid housing apart on the original Mopar/Denso starter to look at all the parts that were mentioned.

A few observations on the process (some of of this was probably covered in previous starter posts on the site):

Below is a photo of what a complete starter repair kit should actually contain, since any of the little parts could be cracked or damaged (photo from an oddball-name China kit on Amazon). The Dorman universal starter repair kit doesn't have the plunger, but it does have two additional copper contacts with different shapes for different starters. Annoyingly, the Dorman contacts are thinner than the original thickness of the unworn areas of the OEM contacts, so they won't last as long.

For the kits that have plungers, Amazon reviewers say the plungers do come in different rod lengths. Could search for kit compatibility with the Nippondenso (or just Denso) part numbers on the starter to make sure of the correct plunger. On my 1st Gen starter, under the Mopar p/n is DENSO/NIPPONDENSO 228000-0360. Info online shows there are several different similar format Nippondenso numbers, probably with a few different plunger lengths. Amazon does say the Victory Lap ND-34SOL Solenoid Repair Kit will work for 1st Gen starter (the listed 96.7 mm plunger length and 34.8 mm diameter are correct). However it doesn't have the several other little parts in the Dorman and other kits, which could be cracked or worn also. I am going to order the Victory Lap kit on Amazon since I already have the Dorman kit with those other parts if needed.
Starter Kit Photo:
Image


From what I read before here, replacing the 1st Gen 3.3L starter is easier than others. On the 1st Gen 3.3L there are three bolts you can access from under the car, with a 3/8" ratchet (and slip-on pipe extension), 15 mm regular socket, 6" extension (for the bottom bolt), and a 15 mm combination wrench. (The nut on one starter cable connector is smaller.) Some people here posted you can loosen the bolts from the engine bay, but I couldn't figure that out. You can only get a very short throw with the wrenches, so it is slow going. There are some contortions involved to keep the removed starter supported off to the side while you remove the cable connections without straining the two cables - you could use some wire or cord if needed. Remember how to wiggle the old starter out to get the new one to go in.

And yes, you have to push down the locking tab on the small wire connector with a small screwdriver before you can remove it. I would not use pliers or it could crack the connector. I just sprayed some CRC electrical contact cleaner on it and slowly wiggled it out with a gloved hand and gentle prying with the little screwdriver. I also cleaned that connector after removal with a small brush and more contact cleaner. I'd check that the wire hasn't pulled away from the connector contact and repair/solder/shrink-tube if needed. Don't forget (like me) to put the ground cable back on the lower bolt after you've cleaned it and the contact area.
Photo of starter installed, tightening bolts:
Image


There is a steel plate shown in the photo with the three bolt holes that fits between the starter and flywheel housing. There is a plastic retainer in one of the holes that is supposed to hold this retainer in place, but it is likely to be cracked or fall off in the process to be lost. The plate is marked with "UP" on one side. Without the retainer, you need to hold the plate in place by inserting two of the bolts and then position the starter and start threading the bolts by hand. Otherwise the plate can get slightly out of place and prevent the starter from being flush with the flywheel housing as you tighten the three bolts. Alternate tightening the bolts to avoid the starter getting canted. Feel all around the starter edge to make sure there is no gap. The old 1st Gen Chilton manual is actually more detailed on this than the FSM or Haynes and does have torque specs for the bolts, but I only have beam-type torque wrenches that don't have enough space, so I just snugged the bolts up tight. You can obviously use a bit of oil or anti-seize on the bolt threads.

The rubber vent tube on one side of the starter is easily damaged. On the reman starter the tube was bent in the box so I had to repair the slightly torn base with some Goop II Max glue. The plastic cover that goes over one of the cable connectors also was loose and did not seem secure to me (it just has two tiny clips), so I put some Goop II Max on that also to hold it in place.
Photo of vent tube:
Image
 
#14 · (Edited)
Thanks for the tips. I put a reman starter in and took the solenoid housing apart on the original Mopar/Denso starter to look at all the parts that were mentioned.

A few observations on the process (some of of this was probably covered in previous starter posts on the site):

Below is a photo of what a complete starter repair kit should actually contain, since any of the little parts could be cracked or damaged (photo from an oddball-name China kit on Amazon). The Dorman universal starter repair kit doesn't have the plunger, but it does have two additional copper contacts with different shapes for different starters. Annoyingly, the Dorman contacts are thinner than the original thickness of the unworn areas of the OEM contacts, so they won't last as long.

For the kits that have plungers, Amazon reviewers say the plungers do come in different rod lengths. Could search for kit compatibility with the Nippondenso (or just Denso) part numbers on the starter to make sure of the correct plunger. On my 1st Gen starter, under the Mopar p/n is DENSO/NIPPONDENSO 228000-0360. Info online shows there are several different similar format Nippondenso numbers, probably with a few different plunger lengths. Amazon does say the Victory Lap ND-34SOL Solenoid Repair Kit will work for 1st Gen starter (the listed 96.7 mm plunger length and 34.8 mm diameter are correct). However it doesn't have the several other little parts in the Dorman and other kits, which that could be cracked or worn also. I am going to order the Victory Lap kit on Amazon since I already have the Dorman kit with those other parts if needed.
Starter Kit Photo:
View attachment 44719

From what I read before here, replacing the 1st Gen starter is easier than 2nd Gen. On the 1st Gen there are three bolts you can access from under the car, with a 3/8" ratchet (and slip-on pipe extension), 15 mm regular socket, 6" extension (for the bottom bolt), and a 15 mm combination wrench. (The nut on one starter cable connector is smaller.) Some people here posted you can loosen the bolts from the engine bay, but I couldn't figure that out. You can only get a very short throw with the wrenches, so it is slow going. There are some contortions involved to keep the removed starter supported off to the side while you remove the cable connections without straining the two cables - you could use some wire or cord if needed. Remember how to wiggle the old starter out to get the new one to go in.

And yes, you have to push down the locking tab on the small wire connector with a small screwdriver before you can remove it. I would not use pliers or it could crack the connector. I just sprayed some CRC electrical contact cleaner on it and slowly wiggled it out with a gloved hand and gentle prying with the little screwdriver. I also cleaned that connector after removal with a small brush and more contact cleaner. I'd check that the wire hasn't pulled away from the connector contact and repair/solder/shrink-tube if needed. Don't forget (like me) to put the ground cable back on the lower bolt after you've cleaned it and the contact area.
Photo of starter installed, tightening bolts:
View attachment 44717

There is an annoying steel plate shown in the photo with the three bolt holes that fits between the starter and flywheel housing. There is a plastic retainer in one of the holes that is supposed to hold this retainer in place, but it is likely to be cracked or fall off in the process to be lost. The plate is marked with "UP" on one side. Without the retainer, you need to hold the plate in place by inserting two of the bolts and then position the starter and start threading the bolts by hand. Otherwise the plate can get slightly out of place and prevent the starter from being flush with the flywheel housing as you tighten the three bolts. Alternate tightening the bolts to avoid the starter getting canted. Feel all around the starter edge to make sure there is no gap. The old 1st Gen Chilton manual is actually more detailed on this than the FSM or Haynes and does have torque specs for the bolts, but I only have beam-type torque wrenches that don't have enough space, so I just snugged the bolts up tight. You can obviously use a bit of oil or anti-seize on the bolt threads.

The rubber plastic vent tube on one side of the starter is easily damaged. On the reman starter the tube was bent in the box so I had to repair the slightly torn base with some Goop II Max glue. The plastic cover that goes over one of the cable connectors also was loose and did not seem secure to me (it just has two tiny clips), so I put some Goop II Max on that also to hold it in place.
Photo of vent tube:
View attachment 44718
You mentioned making sure the starter doesn't get canted and that there are no gaps. That reminds me that the nose tip of the starter has to fit into a shallow boss in the transmission - if you aren't paying attention and have the starter at a slight angle, the starter tip will end up slightly off center of the boss keeping the starter from seating fully flush to the transmission housing. Working from memory so I forget what the exact consequences are if you get the starter in that slightly canted position without you realizing it - possibilities are (one or a combination of): Maybe one or more of the bolts won't be long enough to catch the threads, or bolts will catch the threads but will be cross-threaded, or bolts will catch and thread fine, but when you torque them, you run the risk of damaging or breaking the starter or transmission case - and of course even if you in ignorant bliss were to successfully get it together with cant and gap and starter nose tip not in the boss, the capstan and gear are not going to properly engage the flywheel (with possible damage to starter or flywheel). I remember at least one thread in which the OP got hung up on that there deal.
 
#16 · (Edited)
Following-up on this starter stuff, while I installed a NOS $60 reman Beck-Arnley Pure Energy starter (off ebay, Rockauto also has) for the removed 1st Gen 3.3L Mopar/Denso starter, I got two of the rebuild kits to use in the the Mopar/Denso starter for a back-up. Below are the three kits I found online listed as working in the Mopar/Denso starter for the 1st Gen 3.3L engine. Each kit has different parts.

-Dorman p/n 02349 universal starter repair kit (from Rockauto, Amazon, or local auto part stores), with most small parts but no plunger or gasket. (You've got to replace the plunger.)
-CSS Auto Electric "DENSO STARTER SOLENOID REPAIR KIT CONTACTS Dodge Intrepid, Eagle Vision 3.3L" (on ebay), with WAI brand p/n 66-82603-1 plunger, gasket, correct two contacts and and most small parts.
-Victory Lap ND-34SOL kit (on Amazon) with just the plunger and various shaped copper contacts (you only need two of them).

Photos of the kits are below. Per the Victory Lap Amazon listing the plunger diameter is 34.8 mm and the total length is 96.7 mm, which is the same as what I measured on the OEM plunger. (The company that made the good starter rebuild video that peva linked also sells a kit with just plunger and contacts, but they don't list which Denso starter part numbers it fits; Reviewers of the various other kits on Amazon say Denso-type plungers come in a few different lengths and diameters, and the contacts can also be different shapes.)

The kits seem to be decent quality similar to the OEM parts, but the copper contacts I got in the kits are a bit thinner than the OEM contacts so they won't last quite as long. The other original small parts and gasket might be able to be re-used (like shown in the video), but the plastic pieces, O-rings and gasket could be cracked or broken, so you might need the small parts in the Dorman or CSS Auto Electric kit. (In a pinch the gasket could be fashioned from some ~0.090" thick gasket sheet.)

It may be prudent to replace both the starter and alternator every 80K miles if you want to avoid a tow (especially on a road trip), though mechanics online say they often both last much longer. Like peva said, buying a brand new quality alternator (AC Delco, Remy, NAPA, etc.) would probably be prudent since they are more electrically complex than a starter.

Dorman p/n 02349 kit:
Image


CSS Auto Electric "DENSO STARTER SOLENOID REPAIR KIT CONTACTS Dodge Intrepid, Eagle Vision 3.3L"
Image


Victory Lap ND-34SOL kit:
Image